
Farm & Ranch
Raising Chicks

By Landon Moore
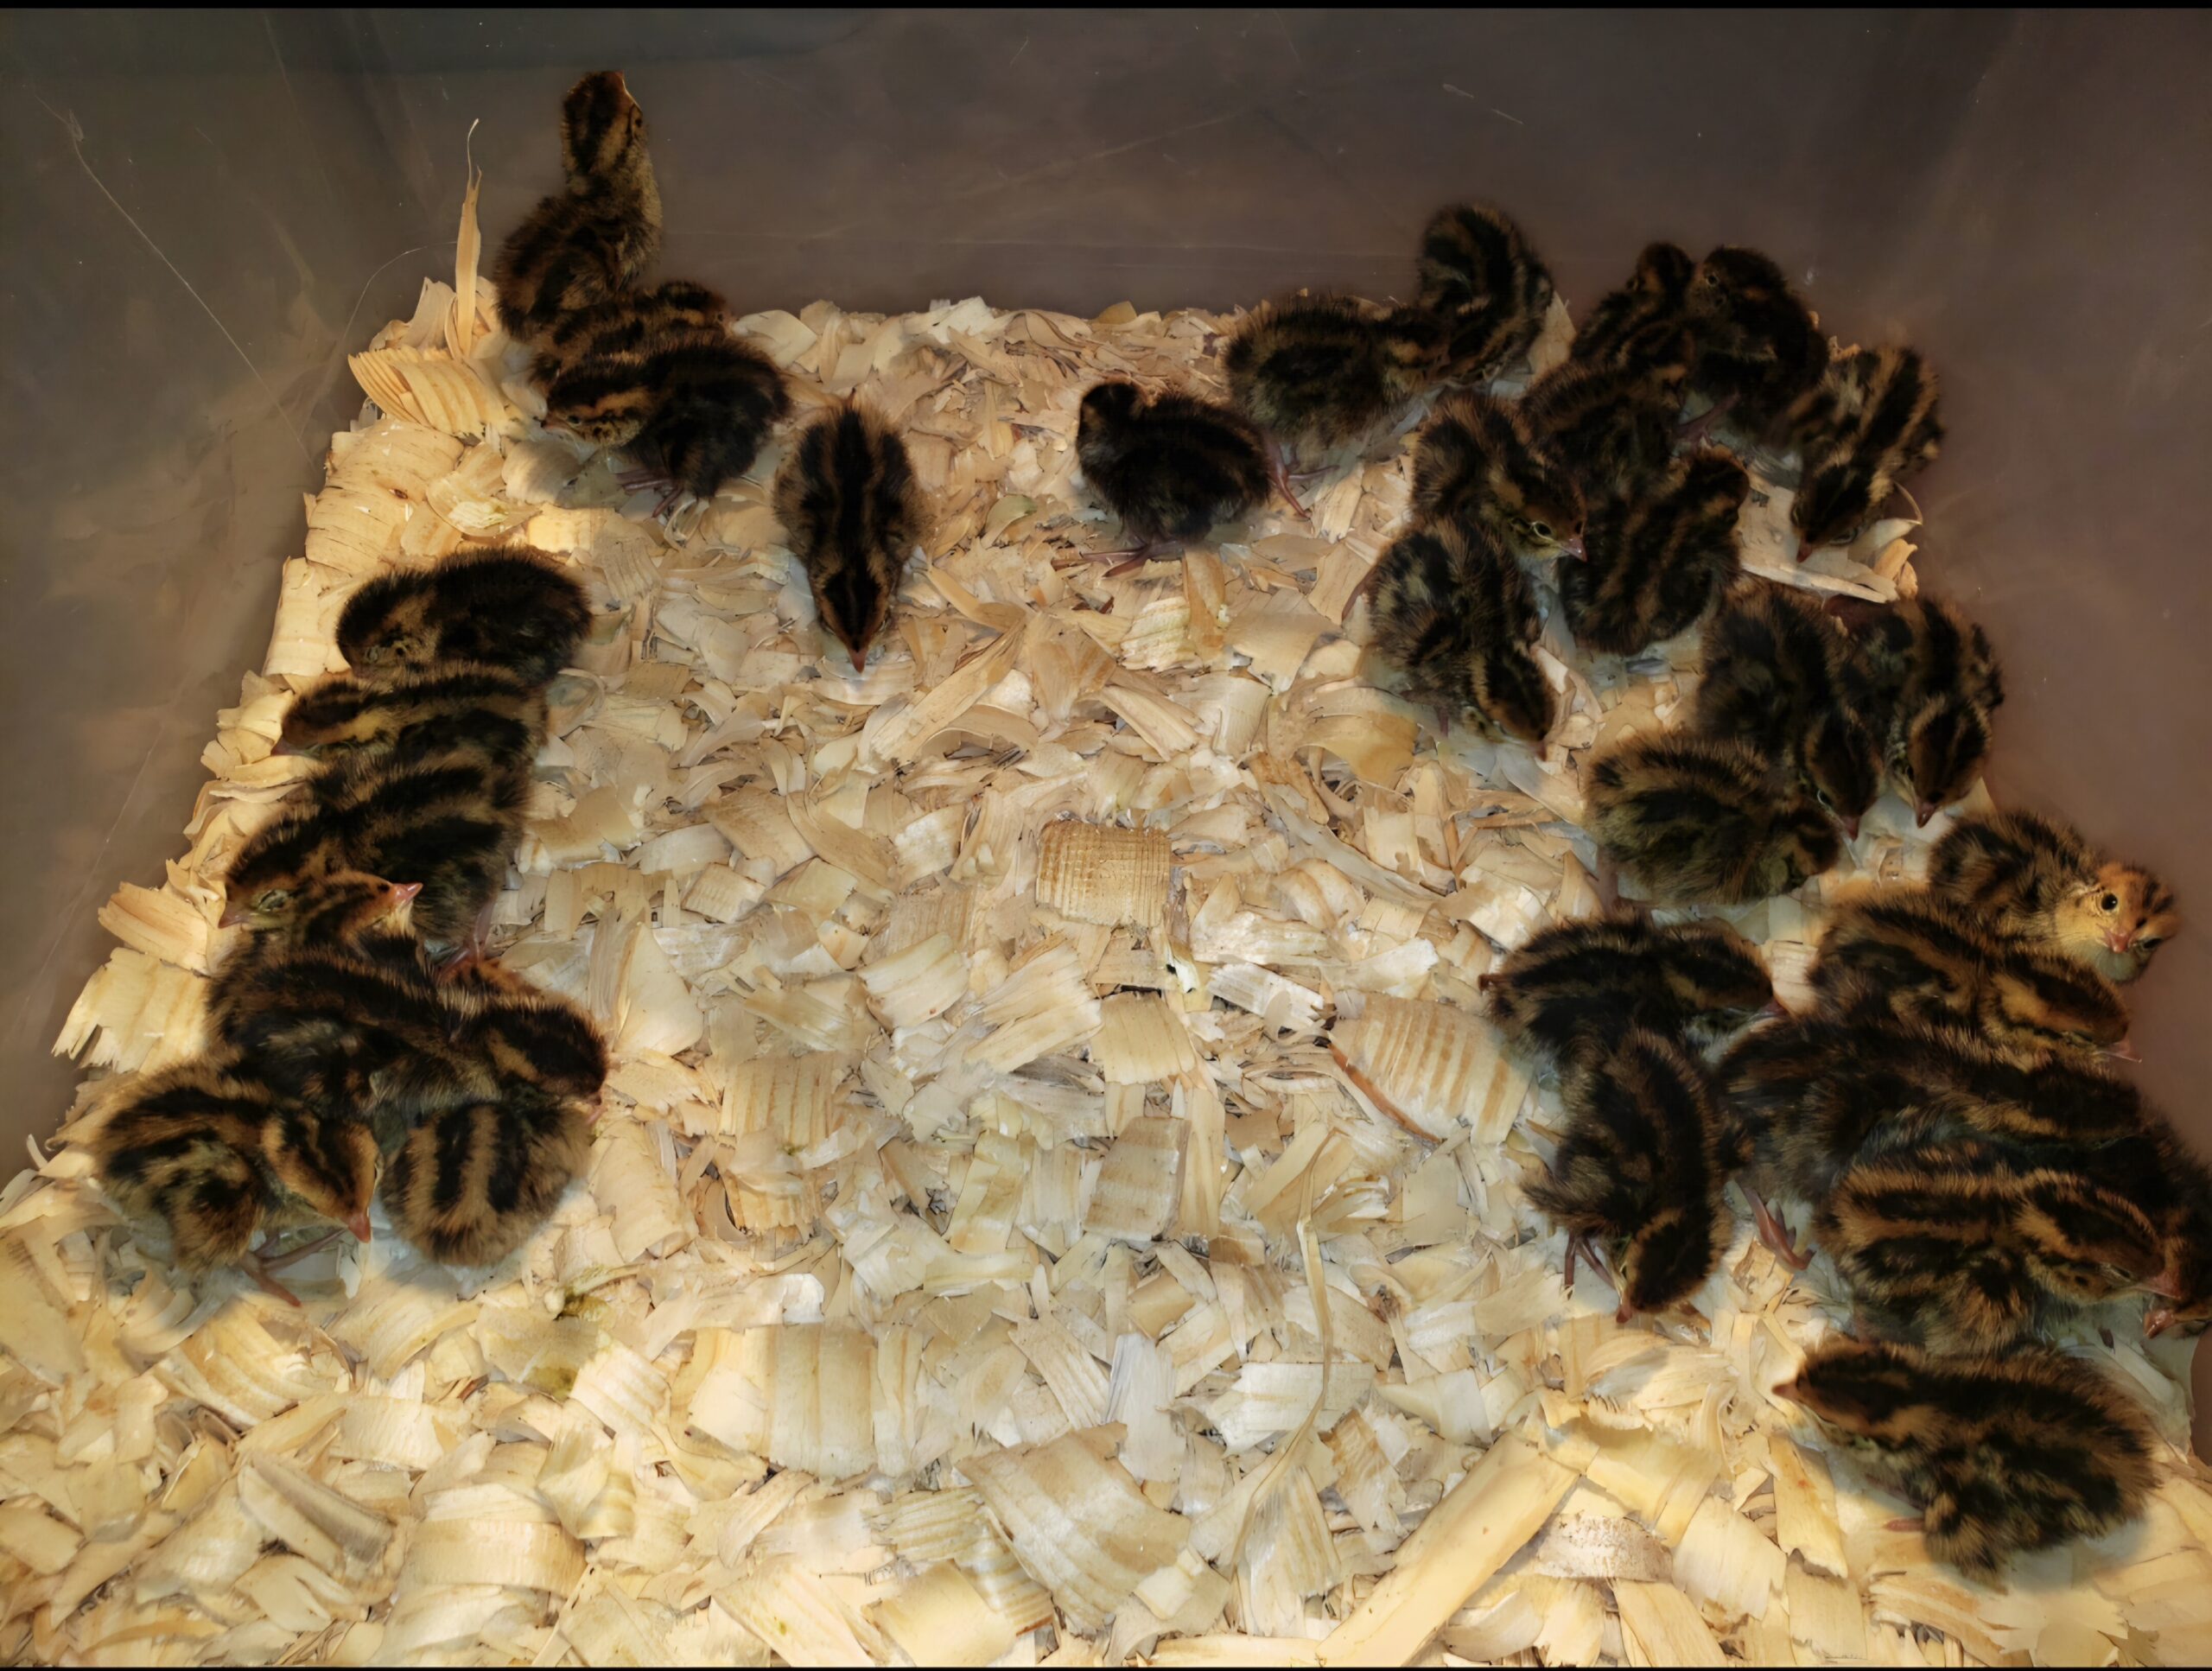
If you keep or are interested in keeping poultry, you will have the desire to raise young birds at some point. If you order chicks, or decide to incubate and hatch eggs, it will be necessary to learn how to brood the resulting hatchlings. While this will vary in specifics between species, the basic rules remain the same. In this article, the word “chicks” will be used, but the general information following also applies to goslings, ducklings, keets, poults, etc.
Brooding poultry is caring for the chicks during the period when they are growing their first feathers. Chicks hatch with a thin coat of down that leaves them susceptible to chilling. The mother keeps them warm by continuing to sit on the young for the first weeks after hatching. If you plan to hatch your own flock’s eggs you may wonder why you should bother to do it artificially, especially if you have broody birds. The answer is that modern incubators are much more likely to result in live chicks, can incubate far more eggs and keep the extremely vulnerable hatchlings safe as they emerge, especially from ants. Of course if you are purchasing chicks, brooding is your only option.
Before your eggs hatch or the chicks arrive, you will want to have the brooder set up, and ready to go. The first issue to decide is location. You will want a covered and secured place to set up the brooder. Be sure it has plenty of air flow; as anyone who has spent any time with birds can attest, fowl of any age produce an unpleasant smell without adequate ventilation. A barn or other outbuilding could work, but be sure it is well secured. A cat, raccoon or other predator could easily kill your chicks if they get the opportunity. A garage is a great option, offering protection and close access to water and electricity. If it lacks windows you will need to open the garage door a few times per day for ventilation. Inside the house is another option (such as in a disused bathroom) especially for very small poultry. This may seem ideal, offering complete protection, easy temperature regulation, water and electrify, but there are drawbacks. Aside from smell, chicks are unbelievably messy and will require extensive and daily cleaning if the room is to remain in even slightly good condition.
The next choice is what the brooder box will be. You can purchase large metal brooders built for hundreds of chicks or expensive tiered systems on rollers. However the best option is usually a plain, heavy-duty plastic storage box. Cheap, easy to move, simple to clean and sanitize, these are the most versatile and efficient option.
The chicks will require (in addition to shelter) heat, bedding, feed and water. The heat will come in the form of a small heat lamp or even a very strong and hot light bulb suspended above one end of the brooder box. Be sure it is securely prevented from falling into bedding or you could end up with a fire. You can make a metal screen to place over the box which protects them from predators in addition to falling lamps. Place a thermometer at the surface of the bedding before adding the chicks and adjust the heat lamp until the thermometer measures 95 degrees. You will reduce this by 5 degrees each week until their feathers have grown out. Even if the weather reaches or exceeds this temperature a lamp will be needed at night.
You may be intimidated by charts showing the exact temperature requirements of various poultry species and wonder how you can possibly keep the heat exactly right during daily temperature shifts. You do not need to be overly worried about this. Why? Because the chicks will tell you if they are comfortable through their behavior. After placing them in the brooder simply watch them for a few minutes. Do they crowd underneath the heat, piling on each other to conserve heat? Lower the bulb a bit. Are they straining against the opposite wall and cheeping in stress? Move it further away. Are they fairly evenly spread out, some exploring their new environment and some sleeping under the heat? Perfect. This is why the heat should be placed over one end of the brooder. If it is over the entire box you will have no way of knowing if your chicks are over-warmed.
The next issue is bedding. When the chicks are first placed in the brooder the bedding should be a layer of paper towels or (non-slick) newspaper. This even surface provides good traction for the birds preventing splayed legs and also prevents them from getting stuck somewhere and dying or else ingesting bedding before they learn what feed is and dying. It is always good to keep in mind that chicks of all kinds are morbid little things that will jump at the first opportunity for death in their initial couple weeks of life. It is up to you to deny them the opportunity until their self-preservation instinct kicks in. Chicks mature shockingly fast and in just a couple of days the bedding may be exchanged for pine shavings. You may still want a layer of paper at the bottom to make cleaning easier. You do not want to disturb the chicks without necessity, so you can add a fresh layer of shavings a couple of times as needed before you completely clean the box.
Commercial chick feed is available that is meant to be suitable for all species. For game birds, guineas and turkeys it’s often better to just use an adult gamebird crumble feed as their protein requirements are extremely high. For waterfowl, be sure the feed has enough niacin if it isn’t specifically formulated for them. If it does not have enough, you can sprinkle some brewer’s yeast over the top. Medicated feed is usually formulated for chicks specifically and may not be safe for other species (especially for waterfowl), so be sure to check before feeding. Chicks aren’t especially bright and may not be able to figure out how to operate the feeder at first. You can help them by placing a small pile of their feed on a paper plate (or paper towel for quail) where they can see it more easily.
For waterers, their basically two main types; open waterers and bottles. The bottles can be complicated with multiple pieces and nipples to drink from or simply a two piece plastic quart jar and base that screw together. The open waterers will usually be a miniature trough with a hinged or sliding lid that allows the chicks to stick their heads in without falling into the waterer and drowning. Generally the bottle type waterers will stay cleaner and hold more, but for waterfowl open waterers are preferred so they may submerge their bills for cleaning. Quail should be given bottles with special quail bases which are very small to prevent drowning. It can be extremely beneficial to dissolve a couple tablespoons of sugar (or commercially-made chick electrolytes) into the water for the first few days, especially if the chicks came by mail. Provide chicks with warm water the first few days (use your inner wrist to determine a suitable temperature, as you would milk for a bottle) to prevent chilling them. Be sure to carefully dunk each chick’s beak into the water when they are placed in the brooder so they learn what it is.
Chicks are most fragile for the first three days and should be handled as little as possible. When shipped, they will arrive stressed and possible chilled and care during this period is the most crucial. For the first three days after hatching, chicks are still absorbing their egg yolk and will not require outside nutrition and therefore may eat sparingly. It is best practice to sanitize the feeders and waterers regularly, but be aware that all birds will leave manure in their water. Don’t let the water remain filthy, but don’t expect it to remain sterile, either. Likewise, a stinking bog will not yield thriving poultry, but it is unnecessary to fanatically clean the brooder constantly. When the chicks are fully feathered will vary by species (three weeks for quail, six weeks for chickens), but once this happens it will be time for your young feathered friends to graduate to their new pens.
By Jared Groce
The rural land market held steady in July after the increase we saw in June, with nearly identical numbers of transactions and similar pricing. Buyer inquiries rose noticeably in July, with most agents and brokers reporting a sharp increase in calls and showings. Title companies and lenders also report more transactions since July 1, which suggests buyer sentiment may be picking up as summer draws to an end.
The gap between list price and sale price improved compared with June, with the sale-to-list ratio running much higher than the previous month. Total days on market dropped somewhat from June. Several larger tracts also closed in July compared with the rest of 2026 to date.
It is still a buyer’s market, and I expect that trend to continue through the year. Once the Fed lowers interest rates, buyer sentiment will likely climb even more and push us back toward a seller’s market, but who knows when that might happen. In the meantime, we are all fighting higher prices at the pump, higher input costs for seed, fertilizer and hay, and big jumps in insurance premiums across the board. The good news, if you are selling, is that cattle prices remain at an all-time high.
They say the best time to plant a tree was 20 years ago, and the second-best time is today. The same is true of buying land. Get some dirt on your hands.
| County | Area | Acres | $/Acre | List Price | Sold Price | Sale/List | DOM |
|---|---|---|---|---|---|---|---|
| Clay | Henrietta | 25.02 | $13,789 | $345,000 | $345,000 | 100.00% | 5 |
| Clay | Petrolia | 77.72 | $4,825 | $399,000 | $275,000 | 94.00% | 24 |
| Clay | Average | 51.37 | $9,307 | $372,000 | $360,000 | 97.00% | 15 |
| Collin | Blue Ridge | 11.03 | $30,740 | $358,400 | $339,000 | 94.60% | 58 |
| Collin | Blue Ridge | 11 | $48,182 | $550,000 | $530,000 | 96.40% | 325 |
| Collin | Farmersville | 20.97 | $30,514 | $625,000 | $640,000 | 102.40% | 443 |
| Collin | Farmersville | 32.9 | $30,395 | $1,149,000 | $1,000,000 | 87.00% | 315 |
| Collin | Anna | 14.2 | $73,970 | $1,200,000 | $1,050,000 | 87.50% | 50 |
| Collin | Average | 18.02 | $42,760 | $776,480 | $711,800 | 93.60% | 238 |
| Cooke | Collinsville | 11 | $35,364 | $389,000 | $389,000 | 100.00% | 343 |
| Cooke | Gainesville | 43.08 | $15,669 | $775,400 | $675,000 | 87.00% | 5 |
| Cooke | Average | 27.04 | $25,616 | $582,220 | $532,000 | 93.50% | 174 |
| Denton | Krum | 11.93 | $25,086 | $300,000 | $299,204 | 99.70% | 34 |
| Denton | Ponder | 14.92 | $46,917 | $988,200 | $700,000 | 70.80% | 170 |
| Denton | Denton | 22.37 | $90,198 | $2,017,730 | $2,017,730 | 100.00% | 160 |
| Denton | Sanger | 122.36 | $26,153 | $3,360,000 | $3,200,000 | 95.20% | 289 |
| Denton | Sanger | 328.06 | $10,813 | $3,608,000 | $3,547,186 | 98.30% | 11 |
| Denton | Average | 99.93 | $39,833 | $2,054,786 | $1,952,824 | 92.80% | 133 |
| Grayson | Sherman | 23.06 | $13,010 | $395,000 | $300,000 | 75.90% | 7 |
| Grayson | Bells | 11 | $303,909 | $360,000 | $340,000 | 94.40% | 356 |
| Grayson | Collinsville | 11.39 | $49,109 | $619,500 | $559,350 | 90.30% | 183 |
| Grayson | Gunter | 11.5 | $69,000 | $882,874 | $793,500 | 89.90% | 259 |
| Grayson | Average | 14.24 | $40,009 | $507,250 | $449,675 | 90.10% | 221 |
| Jack | Jacksboro | 29.17 | $8,742 | $261,072 | $255,000 | 97.70% | 191 |
| Jack | Jacksboro | 171 | $11,809 | $2,223,000 | $2,019,298 | 90.80% | 148 |
| Jack | Poolville | 202 | $15,347 | $3,434,000 | $3,100,000 | 90.30% | 312 |
| Jack | Average | 134.06 | $11,966 | $1,972,691 | $1,791,433 | 92.90% | 217 |
| Montague | Bowie | 10.01 | $17,483 | $175,000 | $175,000 | 100.00% | 5 |
| Montague | Bowie | 46.3 | $10,043 | $650,000 | $465,000 | 71.50% | 10 |
| Montague | Bowie | 56.02 | $12,049 | $700,250 | $675,000 | 96.40% | 30 |
| Montague | Forestburg | 212.17 | $7,494 | $2,697,000 | $1,590,000 | 93.70% | 369 |
| Montague | Nocona | 192.32 | $11,716 | $2,355,840 | $2,300,000 | 97.60% | 91 |
| Montague | Nocona | 575.87 | $11,287 | $6,910,440 | $6,500,000 | 94.10% | 56 |
| Montague | Nocona | 934.29 | $8,244 | $8,806,000 | $7,701,855 | 87.50% | 333 |
| Montague | Average | 290.14 | $11,188 | $3,042,076 | $2,772,408 | 91.50% | 128 |
| Wise | Chico | 11.4 | $18,421 | $210,000 | $210,000 | 100.00% | 170 |
| Wise | Chico | 14 | $17,143 | $249,900 | $240,000 | 96.00% | 18 |
| Wise | Decatur | 10.15 | $28,498 | $379,000 | $289,258 | 76.30% | 115 |
| Wise | Decatur | 10.15 | $28,498 | $379,000 | $289,258 | 76.30% | 115 |
| Wise | Decatur | 11.61 | $28,498 | $438,000 | $330,865 | 75.50% | 115 |
| Wise | Decatur | 14.58 | $28,506 | $524,880 | $415,619 | 79.20% | 115 |
| Wise | Boyd | 61.34 | $11,575 | $775,000 | $710,000 | 91.60% | 251 |
| Wise | Poolville | 115.69 | $9,076 | $1,300,000 | $1,050,000 | 80.80% | 75 |
| Wise | Average | 31.11 | $21,277 | $533,973 | $441,875 | 84.10% | 122 |
By Laura Nelson
Planting a seed may be the ultimate act of faith and hope. Giving it the right conditions to thrive takes action on our part.
Jim Johnson, Noble Research Institute’s senior regenerative ranching advisor, says building the right conditions in your soil will improve the odds of successful germination and growth.
“Building healthy soil is something we work at every day, all year long,” Johnson says.
Whether you’re planting a cover crop for the first time or trying to add diversity to your pastureland, new seeds have the same requirements for a good start: viable seed, good seed-to-soil contact, adequate moisture, proper temperatures and available oxygen.
“Those aren’t necessarily things that you can just take care of the day you decide to go plant,” Johnson says. “They’re soil management actions that we take every day.”
Start with the best seed
Start with high-quality, vigorous seed.
“A vigorous seed is going to be more forgiving if conditions are less than ideal,” Johnson says. A laboratory can run a cold germination test or a stress test to give you a good idea of a seed lot’s viability.
When comparing seed of the same species, look at the number of seeds per pound. If one rye cover crop has 26,000 seeds per pound and another of the same variety has 16,000, the 16,000-seed lot has bigger seeds.
“You want big, plump seeds for that variety, because the bigger and plumper seeds typically have more of the stored energy they need to get started,” he says.
Maximize seed-to-soil contact
A seed has to soak up moisture from the soil to soften and swell for germination. Picture each seed as a cube. Broadcast it on the surface, and only one side touches the soil. Push it down a little, and parts of the other sides touch the dirt around it. Push it down and firmly cover it with soil, and all six sides can make contact, but only if the soil structure is in good condition.
Hard, compacted soil makes it difficult to get seed into the ground and to get the soil to close back around it. Loose, fluffy soil is full of air gaps that prevent seed-to-soil contact. You want to plant into friable soil that crumbles easily when squeezed, about the consistency of cottage cheese or a moist chocolate cake. That gives the seed its best chance.
Ground cover helps build more friable soil, but too much residue can keep seed from reaching the soil. A well-calibrated, well-maintained no-till drill can plant through tons of residue. If you’re broadcasting seed into grass or a crop field with residue, Johnson suggests using livestock to graze off or remove excess cover first. Used correctly, high-density, short-duration grazing can also help tread broadcast seed into the soil.
If livestock aren’t an option, consider another limited, well-timed disturbance to get the seed in touch with the soil. A quick pass with a disc to chop residue while incorporating the seed, or burning residue just before seeding, can give new plants a fresh start.
Adequate moisture matters
Seed-to-soil contact only works if the soil holds enough moisture to reach the seed. In general, a seed needs at least a quarter inch of precipitation to germinate, plus another quarter to half inch for the plant to establish.
A good, well-timed rain is the quickest path to success, but encouraging diverse root systems over the long term builds a moist, fertile environment.
“We always have to be thinking about how we can set the soil up to absorb and hold water,” Johnson says. Heavier residue helps hold moisture and protects the surface from evaporation, and living roots open pore space so water can find its way in.
Healthy soil that holds moisture helps insulate a seed waiting for rain. If you see noticeable erosion on your land, your water cycle is broken. Keep the ground covered to slow water down and help it soak in.
Keep the temperature right
Many seeds tolerate soil temperatures from just above freezing into the low 100s, but the ideal range for germination is typically 65 to 85 degrees Fahrenheit. You’ll want to be confident soil temperatures will stay in the right range for that seed for at least three days in a row, and ideally five. A forecast showing a favorable trend can work, too.
“If we’re planting a cool season crop in the fall, we might be able to plant into soil we know is too hot to germinate,” Johnson says. “But if the days are getting shorter and cooler, and we have a little rain in the immediate forecast, we’re trending in the right direction.”
Timing always matters, but your temperature window widens as your soil health improves.
“We know we can plant earlier or later if we have good, healthy soil,” he says. Healthy, covered, root-filled soil holds a steadier temperature regardless of the air temperature.
Give it room to breathe
Waterlogged or compacted soils starve seeds of the oxygen they need. A heavy rain may soak a seed and trigger germination, but the seed will drown if it sits underwater for more than a couple of days.
One problem often leads to another. Wet soils compact easily, so keep animals and machinery off waterlogged ground, especially before planting. The right amount of ground cover will also soften the effects of compaction.
To show how much ground cover reduces compaction, Johnson often lays his hand on the ground during Noble’s Land Essentials course and invites the biggest student in the class to stand on it. First, though, he gathers plant residue and litter and covers his hand.
“It’s a pretty powerful demonstration when they can stand on my hand, and I hardly feel it,” Johnson says. “That’s how big a cushion residue makes for our soil surface.”
Preventing compaction, building organic matter and improving water absorption also help keep the soil surface from crusting over a seed, another obstacle to a good stand.
“All these things matter and make a difference in your seed germination,” Johnson says. “Healthy soil with good soil structure is easier to plant into, easier to get all the conditions your seed needs to germinate and establish, and easier to get a good stand in.”
Unpredictable weather can still wreck the best-laid plans, but good soil conditions give your seeds their best chance whether you drill or broadcast your new forage crop.
By Savannah Magoteaux
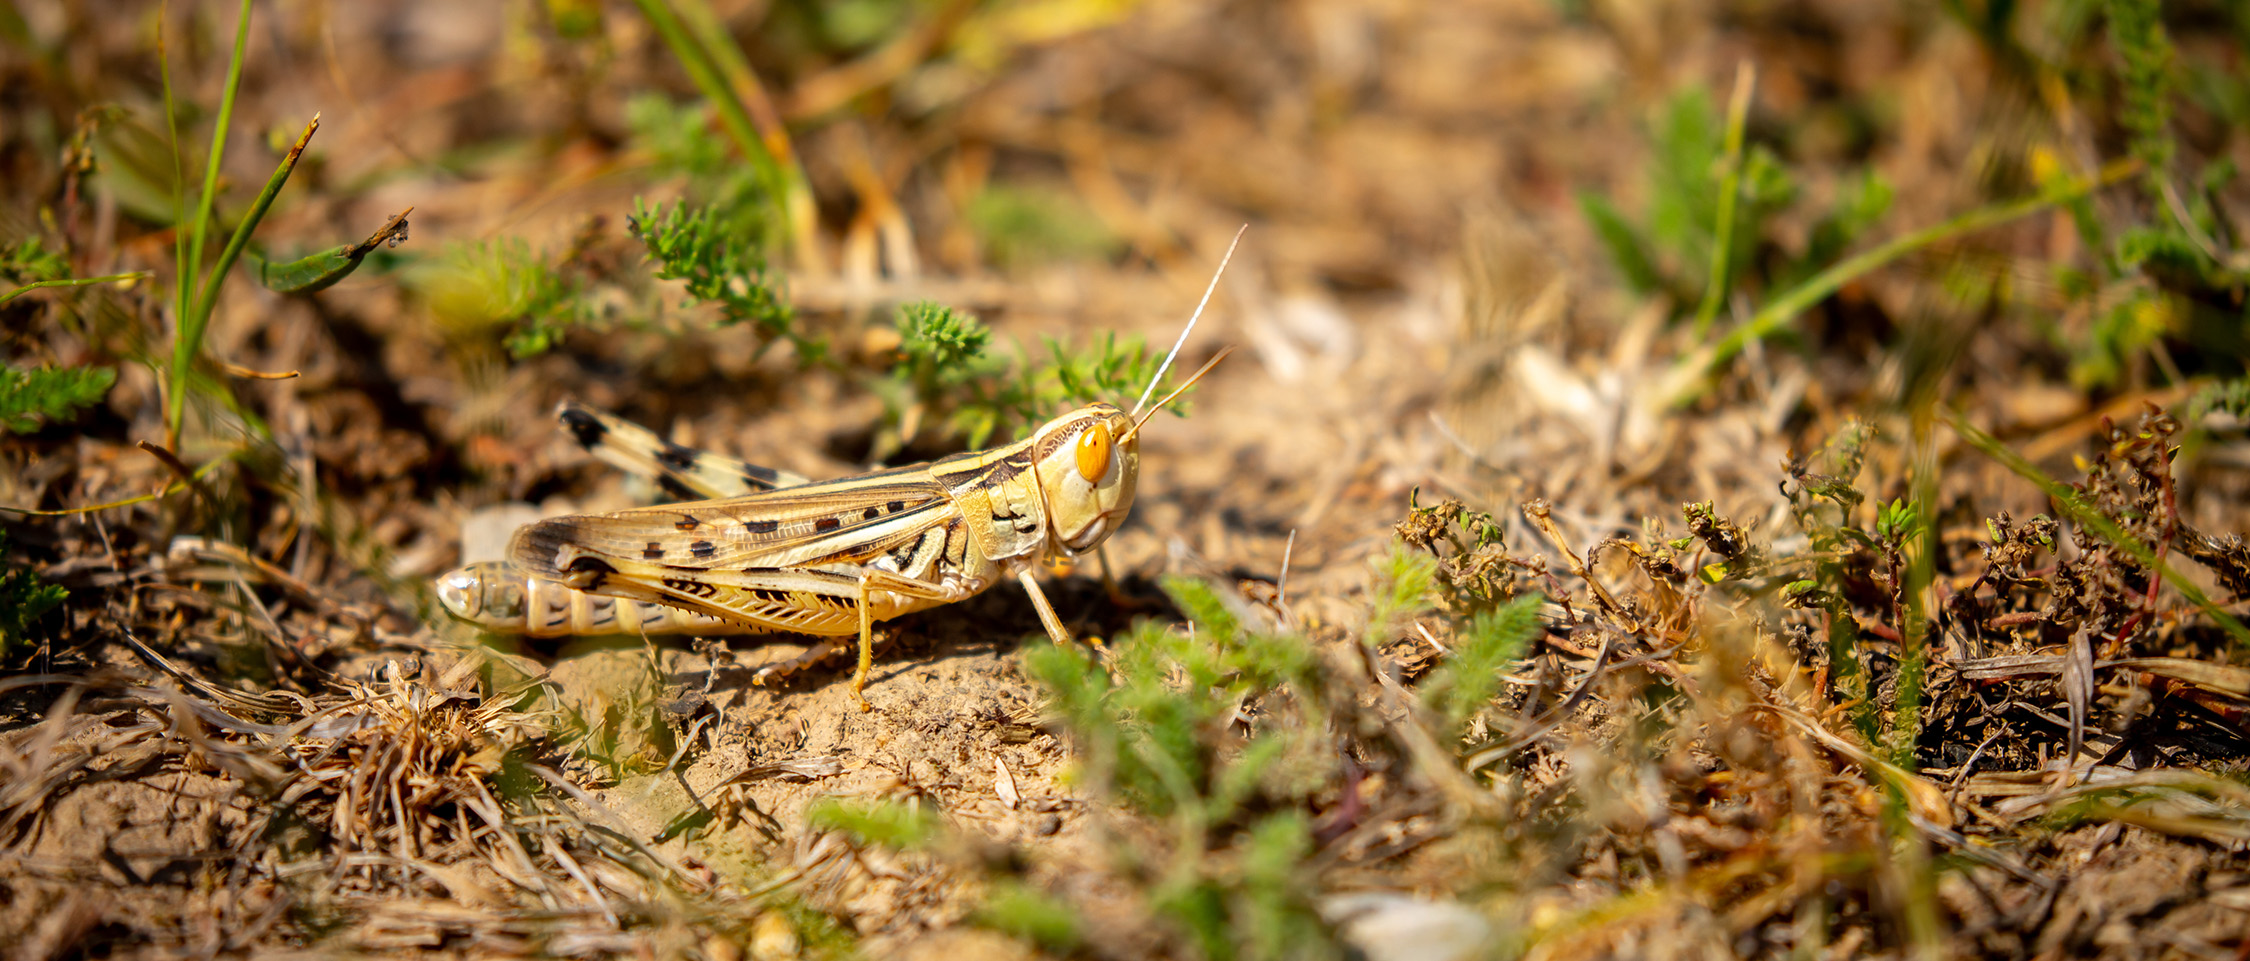
Walk across a pasture in a bad grasshopper year, and you’ll hear them before you see them. Hundreds of insects scatter with every step, springing out of the grass in all directions. A few grasshoppers are a normal part of the landscape, but a population explosion can frustrate farmers, ranchers and homeowners alike.
Grasshoppers can eat tremendous amounts of vegetation. They strip forage from pastures, damage gardens, defoliate young trees and feed on many row crops. In drought years, when forage is already short, heavy grasshopper pressure makes a hard situation worse.
You can reduce the damage. The challenge is knowing when control will work and when it is too late to make much difference.
Why are there so many this year?
Grasshopper numbers rise and fall from year to year, and weather plays a major role in whether they stay manageable or explode.
Warm, dry springs generally favor grasshopper survival. Females lay egg pods in undisturbed soil during late summer and fall. Those eggs stay in the ground through winter and hatch the following spring.
If the winter is mild and the spring stays dry, more young grasshoppers survive. Dry weather also suppresses many of the fungal diseases that normally help keep grasshopper numbers down.
By summer, millions of young insects may already be feeding across rangeland and pastures.
Timing is everything
One of the biggest mistakes landowners make is waiting until grasshoppers have fully developed wings before deciding to act.
Young grasshoppers, called nymphs, are much easier to control. They stay concentrated near where they hatched, can’t fly long distances and take much less insecticide if treatment becomes necessary.
Once they become winged adults, the picture changes. Adult grasshoppers move easily and can fly into treated areas from neighboring fields. Even if a treatment knocks down the local population, new insects may keep arriving all summer.
That is why many Extension specialists stress early monitoring instead of waiting until the damage is obvious.
How much damage can they cause?
Grasshoppers feed on hundreds of plant species. In pastures, they eat grass your livestock would otherwise graze. During severe outbreaks, they may also feed on broadleaf plants, garden vegetables, flowers and young shrubs.
In drought years, the damage shows even more because forage is already stressed. Grasshoppers often gather along field edges first, then move deeper into pastures as food runs short.
Young trees can suffer, too. Newly planted windbreaks, fruit trees and ornamental trees may lose a lot of foliage when grasshopper numbers are high.
What can you do?
No single solution eliminates grasshoppers, but several practices can reduce the damage.
Start with regular scouting. Walking fields every week in late spring and early summer lets you spot rising populations before serious feeding begins.
Good pasture management helps, too. Healthy, vigorous forage generally holds up to feeding better than drought-stressed or overgrazed pasture. Avoiding overgrazing leaves plants more leaf area to recover after insects feed.
Around gardens and homes, mowing tall weeds and unmanaged vegetation can reduce the places where grasshoppers feed and reproduce. It won’t stop an outbreak, but it can make your property less attractive to them.
Natural predators pitch in. Birds, wild turkeys, guineas, chickens, spiders, robber flies and praying mantises all eat grasshoppers. They rarely provide full control in outbreak years, but they help keep numbers lower in normal seasons.
Insecticides can work, but don’t treat them as an automatic solution. Treatment generally works best while most grasshoppers are still immature nymphs. By the time adults are flying, you may need repeated applications because new insects keep moving into treated areas.
Whether treatment pays often depends on how heavy the infestation is and how valuable the crop or pasture is. Extension recommendations commonly use population thresholds to help decide whether control is economically justified, rather than treating every field just because grasshoppers are present.
If you use insecticides, choose products labeled for the site, and follow all label directions on application rates, grazing restrictions and environmental precautions.
Once adult females start laying eggs in late summer, there is little you can do. Those eggs stay in the soil until spring, so early monitoring the next year matters even more after a big outbreak.
Grasshopper populations rarely stay at outbreak levels forever. Weather, predators, disease and natural cycles eventually bring numbers back down. In years that favor grasshoppers, though, producers who scout early and respond quickly usually fare far better than those who wait until the pasture appears to be moving.
No one can eliminate grasshoppers from the landscape, and no one should try. They are a natural part of the ecosystem and an important food source for many wildlife species. The goal is to hold damage to an acceptable level while protecting the long-term health of your pastures, crops and beneficial insects.
By the time grasshoppers are flying up with every step you take through the pasture, much of the damage is already done. The best defense starts weeks earlier, while the insects are young, populations are easier to manage and you have more options.




-

 Country Lifestyles4 years ago
Scott & Stacey Schumacher: A Growth Mindset
-
 Country Lifestyles10 years ago
Style Your Profile – What your style cowboy hat says about you and new trends in 2017
-
 Horsefeathers12 years ago
Mount Scott: Country Humor with David Gregory
-
 Country Lifestyles10 years ago
June 2016 Profile – The man behind the mic: Bob Tallman
-
 Outdoor11 years ago
Buttercup or Primrose?
-
 Country Lifestyles10 years ago
December 2016 Profile, Rusty Riddle – The Riddle Way
-
 HOME10 years ago
Grazing North Texas – Wilman Lovegrass
-
 The Natural Horseman9 years ago
This is why we do what we do — RayeAnn and Cisco